#php zip files for download
Explore tagged Tumblr posts
Visit Tumblr Blog
Explore Tumblr blogs with no restrictions, modern design and the best experience.
Last Seen Tumblr Blogs


Fun Fact
70% of Tumblr users say the Dashboard is their favorite place to spend time online.
Text
Dairy Farm Shop Management System Using PHP and MySQL

The Dairy Farm Shop Management System (DFSMS) is a web based application that can be accessed over the web. This system can be used to automate the workflow of dairy shop and their invoices.
The project has been planned to be having the view of distributed architecture, with centralized storage of the database. The application for the storage of the data has been planned. Using the constructs of MySQL Server and all the user interfaces has been designed using the PHP technologies. The database connectivity is planned using the “MySQL Connection” methodology. The standards of security and data protective mechanism have been given a big choice for proper usage. The application takes care of different modules and their associated reports, which are produced as per the applicable strategies and standards that are put forwarded by the administrative staff.
Click: https://phpgurukul.com/dairy-farm-shop-management-system-using-php-and-mysql/
Project Modules
DFSMS is a web-based application which manages the products of dairy shop. It has one module i.e. admin who manages all the functions of the dairy shop.
Admin Features :
Dashboard: In this section, admin can see all detail in brief like Total listed categories, companies, products and also see the sales.
Category: In this section, admin can add new categories and edit, delete old categories.
Company: In this section, admin can add new companies and edit, delete old companies.
Product: In this section, admin can add new products and edit old products.
Search: In this section, admin can search for a product then add the product into the cart and generate invoice /receipt.
Invoices: In this section, admin can view all generated invoices/receipts.
Reports: In this section, admin can generate two reports, one is B/w date and another one is for sales.
Admin can also update his profile, change the password and recover the password.
How to run the Dairy Farm Shop Management System Project (DFSMS)
1. Download the zip file
2. Extract the file and copy dfsms folder
3.Paste inside root directory(for xampp xampp/htdocs, for wamp wamp/www, for lamp var/www/html)
4. Open PHPMyAdmin (http://localhost/phpmyadmin)
5. Create a database with name dfsms
6. Import dfsms.sql file(given inside the zip package in SQL file folder)
7.Run the script http://localhost/dfsms
*********************Admin Credential*********************
Username: admin Password: Test@123
PHP Gurukul
Welcome to PHPGurukul. We are a web development team striving our best to provide you with an unusual experience with PHP. Some technologies never fade, and PHP is one of them. From the time it has been introduced, the demand for PHP Projects and PHP developers is growing since 1994. We are here to make your PHP journey more exciting and useful.
Email: [email protected] Website : https://phpgurukul.com
0 notes
Text
CloudArcade Nulled Script 1.9.0

Discover the Power of CloudArcade Nulled Script: Build Your Own Game Portal Today Looking to launch your own online gaming website with zero coding knowledge? The CloudArcade Nulled Script is the perfect solution for anyone wanting to build a sleek, professional HTML5 web game portal CMS—completely for free. This powerful and lightweight gaming CMS offers the ultimate flexibility to create a fully functional arcade website in just minutes. With our nulled version, you gain full access to all premium features without spending a dime. What is CloudArcade Nulled Script? The CloudArcade Nulled Script is a feature-rich, customizable game CMS that allows users to create modern gaming websites with ease. Originally available through premium platforms, this script has been nulled and made available for free download on our platform��making it a budget-friendly choice for aspiring game publishers and developers alike. This CMS was designed specifically for webmasters who want to focus on game publishing without getting bogged down by complex configurations. Whether you’re planning to create a browser game portal or a casual gaming blog, CloudArcade adapts seamlessly to your vision. Technical Specifications Script Type: PHP-based CMS Database: MySQL Frontend: Responsive HTML5 design Supported Formats: HTML5, Flash (SWF), Unity WebGL Installation: One-click installer Top Features and Benefits Modern Design: Fully responsive UI with clean, modern aesthetics for desktop and mobile users. Easy Game Management: Upload, categorize, and manage games in a few simple steps. Custom Pages: Add static pages such as About Us, Contact, or Terms effortlessly. SEO Optimized: Built-in meta tags and clean URL structures help boost search engine visibility. Ad Support: Monetize easily with integrated ad spaces for banners or affiliate links. User Registration: Allow players to register and save scores or favorite games. Why Choose CloudArcade Nulled Script? With the CloudArcade Nulled Script, you don’t just get a stripped-down version—you get the full experience, unlocked and unrestricted. Unlike limited demos, this nulled version retains all functionalities, ensuring you can fully explore what the platform has to offer. Best of all, it's absolutely free. There’s no better way to break into the online arcade industry with zero startup cost. Use Cases for CloudArcade Nulled Script Game Portal Startups: Launch a full-featured game site in minutes. Educational Websites: Host brain games and puzzles for students. Mobile Gaming Sites: Deliver fast and responsive gameplay to mobile users. Ad Revenue Portals: Monetize traffic with ads while offering free games. Simple Installation Guide Download the CloudArcade Nulled Script from our site. Extract the zip file and upload contents to your web server. Run the installation wizard via your browser (e.g., yourdomain.com/install). Enter your MySQL credentials and complete setup. Login to your dashboard and start uploading games! Our nulled version comes with complete documentation to guide you through the setup process. You can also customize the site layout and theme with just a few clicks—no coding skills required. Frequently Asked Questions (FAQs) Is the CloudArcade Nulled Script safe to use? Yes, our nulled version is thoroughly checked to ensure it’s clean and malware-free. We recommend downloading only from trusted sources like our platform to avoid security risks. Can I monetize my CloudArcade website? Absolutely! The script comes with built-in ad support, allowing you to add banners, popups, and affiliate links for monetization. Is this script beginner-friendly? Yes. CloudArcade is designed with simplicity in mind. The admin panel is intuitive, and setup can be completed without technical knowledge. Can I customize the design? Yes, the script supports custom themes and layout changes. You can easily adjust fonts, colors, and navigation to match your branding. Get Started with CloudArcade Nulled Script Now
Don’t miss the chance to build your own gaming empire. The CloudArcade Nulled Script gives you the power, flexibility, and functionality of a premium CMS—without the price tag. Click the download button now and launch your free arcade site today. Looking for more tools to power your site? Explore our vast collection of nulled plugins to extend your website’s functionality. And if you're into design, be sure to check out the best nulled themes available for instant download.
0 notes
Text
How to Install XAMPP for Windows 10 - XAMPP WordPress For Beginners
To install XAMPP on Windows 10 and set it up for WordPress, follow these steps:
Step 1: Download XAMPP
Go to the official XAMPP website.
Click on the "XAMPP for Windows" button.
Once the installer is downloaded, locate the .exe file (usually in the Downloads folder).
Step 2: Install XAMPP
Double-click the .exe file to start the installation process.
Choose the components you want to install. For WordPress, you need at least Apache, MySQL, and PHP. These are selected by default, so you can leave them as is.
Choose the installation folder (default is usually fine).
Click "Next" and follow the prompts.
During installation, the installer may ask if you want to start the XAMPP Control Panel. Leave it checked and click "Finish."
Step 3: Start Apache and MySQL
Open the XAMPP Control Panel (it should have opened automatically, or you can search for it in the Start menu).
Click the "Start" button next to Apache (this will run the web server).
Click the "Start" button next to MySQL (this will start the database server).
Make sure both Apache and MySQL show "Running" in green.
Step 4: Install WordPress
Download the latest version of WordPress from the official WordPress website.
Extract the WordPress ZIP file.
Move the extracted folder (the WordPress folder) into the htdocs folder of your XAMPP installation (usually located at C:\xampp\htdocs).
Step 5: Create a Database for WordPress
Open your browser and go to http://localhost/phpmyadmin/.
In the phpMyAdmin dashboard, click on "Databases."
Create a new database for WordPress. Give it a name (e.g., wordpress_db) and click "Create."
Step 6: Configure WordPress
Open your browser and go to http://localhost/wordpress (or the folder name you chose).
The WordPress installation screen should appear.
Select your language and click "Continue."
On the next screen, enter your database details:
Database Name: The name you created (e.g., wordpress_db).
Username: root (default for XAMPP).
Password: Leave this blank (default for XAMPP).
Database Host: localhost (default).
Table Prefix: Leave as wp_ unless you want to change it.
Click Submit and then Run the Install.
Step 7: Complete the WordPress Setup
Fill in the site details (site title, admin username, password, and email).
Click "Install WordPress."
Once the installation is complete, you’ll see a success message. You can now log in to your WordPress dashboard at http://localhost/wordpress/wp-admin.
Final Notes
To stop your server, go to the XAMPP Control Panel and click "Stop" for Apache and MySQL.
If you need to make your local WordPress site public, you'll have to configure port forwarding or use a tool like Local by Flywheel or XAMPP for public access.
#installxampp#xamppforbeginners#xamppwindows10#wordpressinstallation#localserversetup#runwordpresslocally#xamppwordpress#webdevelopment#phpdevelopment#wordpressforbeginners#tutorial2025#localwordpress#xamppsetup#installingwordpress#wordpresssetup#beginnerfriendly#xamppguide#developmenttutorial#learnwordpress#wordpresslocally
0 notes
Text
Bootloader Unlock Bypass Guide
1. Download these files
👉 Mi flash Tools
👉 Php Zip File
2. Extract Php zip on your PC C local disk

3. From the folder, you can find "bypass.cmd" run it

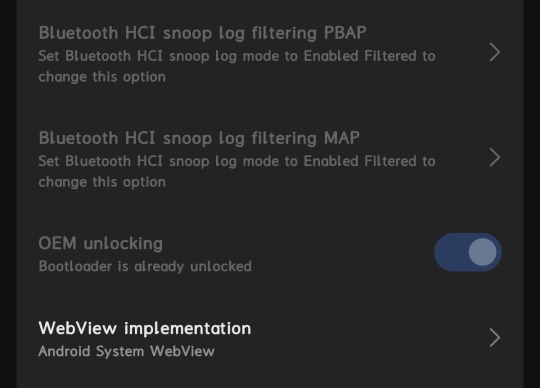
4. Open your developer options in your device & turn on OEM Unlocking
5. Now do Add Mi Account in your device - settings - developer settings - mi unlock status - add account (DON'T USE WIFI, USE MOBILE DATA )

6. Now Wait for the process to complete
7. Open the MiFlash Unlock Tool & login your mi account
8. Now connect your device in fastboot mode to PC
9. Now Click "Unlock" then it will show you 168hr waiting time
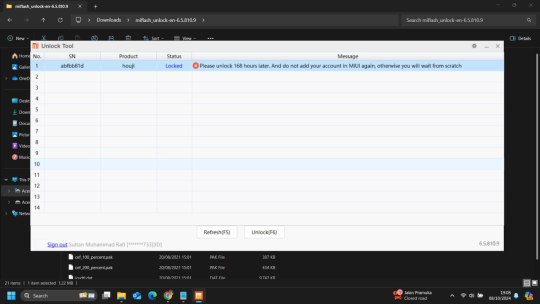
10. After 168hr try to unlock the bootloader with same mi flash tools it will get success.

This is latest working method and one guy successfully unlocked it.
This trick worked on Indonesia rom version 1.0.11.0 and the person who tried this trick is from Indonesia.
Note :- If you guys are getting error code 30001 then try with another mi account it's working on India rom also.
Thanks to Sultan from Xiaomi 14 TG Group for testing this method and sharing the guide for all 😊
1 note
·
View note
Text
JNews Newspaper Magazine Blog AMP Theme v11.5.4
https://themesfores.com/product/jnews-newspaper-blog-amp-theme/ Note: Before installing the theme, please read the ReadMeFirst.txt given in the zip folder, (the theme is GPL Activate Error Showing ignore it). JNews is a theme designed to provide an “all-in-one” solution for every publishing need. With JNews, you can explore endless possibilities in crafting the best fully functional website. We provide 50+ demos perfect for your News site, Magazine site, Blog site, Editorial site, and all kinds of publishing websites. It also provides an automatic import feature to replicate one of the demos you like with just by one click. JNews Newspaper Magazine Blog AMP Theme JNews Theme Feature: Ready Layouts In JNews Theme Responsive Design. Tested on Google Mobile Friendly Header Builder with Live Preview 7 Footer Styles 10 Single Blog Templates Sidefeed Layout Built-in Mega Menu 5 Template Split Contents Ready SEO In JNews Theme SEO performance Share bar with social proof counter Optimized for Google Page Speed as SEO Signal Website schema using JSON LD which is recommended by Google Google AMP Support Support SSL & HTTPS Valid HTML checked using W3.org Validator ALT Image Fallback to make sure your images have ALT tag Performance & Code Minified Javascript Super Lightweight Page Lazy load Image that reduces half of the website size at the first load PHP 7 Ready to improve loading time 2x faster than the older PHP version Compatible with WP Super Cache Database Query Optimized to reduce query by 50% Clean and easy-to-read code with filter & action on each element Advertisement & Marketing Marketing referral & affiliate Easy integration with Google Ads Responsive Advertisement for both Image & Google ads Integrated Email Subscriber with Widget & Visual Composer Block Support for level ads format with Anchor & Vignette Ads. Option & Backend Very intuitive Live preview option panel (Customizer) More than 700 options on Customizer which grant you limitless possibilities Automatic Import will install Plugin, import content, and style to replicate the demo completed with uninstall feature Full integration with Visual Composer (Including Frontend Editor) Add Thousands of fonts from Google Font, Typekit font, or upload your own font Easy Translation using our own easy translation tool Video documentation access right from your backend Automatic Themes Update Social Feature View Counter and Popular Post Live Search Built-in Mega Menu Facebook & Discuss Comment Review System with 3 Point Types Community Forum by BBPress Shopping Cart Popular Plugin Integration Website Push Notification Paywall System Content Locker Content Subscription Membership Pay Per Post Recurring Payment Please note that any digital products presented on the themesfores website do not contain malicious code, viruses or advertising. For License Key:- themesfores.com products are functional without entering a product license code. We are unable to provide a license code for you, and it’s because we already obtain the Plugin/Theme to the original developer. The use of a license code usually is for automatic updates and premium support from the original developer. Besides, we guarantee you to deliver a free manual update and minor assistance for your convenience of using the product. Refund Policy:- If the plugin or theme is not working properly and we also fail to help you then, in that case, you will get the money back. If the plugin and theme are working properly then you will not get the money back. How to fix “style.css missing” error while uploading themes? A common issue that can occur with users new to installing WordPress themes is a “Broken theme and/or stylesheets missing” error message being displayed when trying to upload or activate the theme. This is because the theme download package on ThemeForest includes additional files to the theme such as the documentation, license etc. To solve this simply unzip the theme package you downloaded from themesfores and upload the themename.zip file which is included (with the file being the name of the theme). https://themesfores.com/product/jnews-newspaper-blog-amp-theme/ #NewspaperThemes #WordpressTheme
1 note
·
View note
Text
Medical Card Generation System using PHP and MySQL

The ‘Medical Card Generations System using PHP and MySQL’ has been designed to override the problem of existing manual system. This web application is supported to eliminate and in some case reduce the hardship faced by manual system. The application is reduced as much as possible to avoid errors while entering the data. It’s also provide message while entering invalid data. No formal knowledge is required for the user to operate this system. Overall we said that ‘Medical Card Generations System’ is user friendly.
Project Modules
In ‘Medical Card Generations System’ we use PHP and MySQL Database. This project keeps the records of medical cards. ‘Medical Card Generations System’ has two module i.e. admin and user.
Admin Module
Dashboard: In this section, admin can briefly view the total medical card created in today’s, yesterday’s and in seven days, total read and unread enquiries.
Medical Card: In this section, admin can manage medical cards (add/delete/update).
Page: In this section, admin can manage about us and contact us pages.
Enquiry: In this section, admin reads the inquiries which are sent by users.
Search: In this section, admin can search a particular medical cards by reference number.
Reports of Medical Cards: In this section admin can view and check medical card details in a particular period.
Click: https://phpgurukul.com/medical-card-generation-system-using-php-and-mysql/
Admin can also update his profile, change the password and recover the password.
User Module
Home Page: User can visit home page.
Medical Card: User can view his/her medical card and take print with the help of their Reference Number.
About Us: User sees the details of .website administrator.
Contact Us: User can contact with website administrator and sent enquiry to them.
Note: In this project, the MD5 encryption method was used.
How to run the Medical Card Generation System Project using PHP and MySQL
1. Download the project zip file
2. Extract the file and copy mcgs folder
3.Paste inside root directory(for xampp xampp/htdocs, for wamp wamp/www, for lamp var/www/Html)
4.Open PHPMyAdmin (http://localhost/phpmyadmin)
5. Create a database with the name mgsdb
6. Import mgsdb.sql file(given inside the zip package in SQL file folder)
7. Run the script http://localhost/mcgs
Click: https://phpgurukul.com/medical-card-generation-system-using-php-and-mysql/
1 note
·
View note
Text
Step-by-Step Guide: Installing Magento on VPS with Ubuntu Server
Are you looking to set up your own Magento store on a Virtual Private Server (VPS) running Ubuntu Server? You've come to the right place! In this comprehensive guide, we'll walk you through the process of installing Magento on your VPS, ensuring a smooth setup from start to finish. Whether you're a seasoned developer or just starting out, follow these steps to get your Magento store up and running in no time.

1. Setting Up Your VPS
Before diving into Magento installation, you'll need to have a VPS ready to go. If you haven't already, consider purchasing a Windows RDP (Remote Desktop Protocol) or Linux-based VPS. You can easily buy RDP services from various providers online. Once you have access to your VPS, ensure you have installed Ubuntu Server as your operating system. Installing Ubuntu on RDP is a straightforward process and can be done using remote desktop software.
2. Installing Required Dependencies
Once you have Ubuntu Server up and running on your VPS, it's time to install the necessary dependencies for Magento. Open a terminal window and execute the following commands:
bashCopy code
sudo apt update sudo apt install apache2 mysql-server php libapache2-mod-php php-mysql php-xml php-intl php-gd php-zip php-curl php-mbstring php-xmlrpc unzip
These commands will update your package list and install Apache web server, MySQL database server, and PHP along with its required modules.
3. Configuring Apache and MySQL
After installing the required packages, you'll need to configure Apache and MySQL to work seamlessly with Magento. Start by configuring Apache:
bashCopy code
sudo a2enmod rewrite sudo systemctl restart apache2
Next, secure your MySQL installation by running the following command and following the on-screen prompts:
bashCopy code
sudo mysql_secure_installation
4. Downloading and Installing Magento
With the server properly configured, it's time to download and install Magento. Navigate to the Magento official website and download the latest version of Magento Open Source. Once downloaded, use the following commands to extract Magento files and move them to the Apache web directory:
bashCopy code
sudo mkdir /var/www/html/magento sudo unzip /path/to/downloaded/magento.zip -d /var/www/html/magento sudo chown -R www-data:www-data /var/www/html/magento sudo chmod -R 755 /var/www/html/magento
5. Completing Magento Installation
After moving Magento files to the web directory, you can complete the installation process by accessing your server's domain or IP address in a web browser. Follow the on-screen instructions to configure your Magento store, including database connection details and admin account setup.
Once the installation is complete, don't forget to set appropriate file permissions and clear the Magento cache:
bashCopy code
sudo chmod -R 755 /var/www/html/magento sudo chown -R www-data:www-data /var/www/html/magento sudo systemctl restart apache2
Congratulations! You've successfully installed Magento on your VPS running Ubuntu Server.
Conclusion
Setting up Magento on a VPS with Ubuntu Server is a relatively straightforward process, especially when following a step-by-step guide. By ensuring you have the necessary dependencies installed, configuring Apache and MySQL correctly, and following the Magento installation instructions carefully, you can have your online store up and running in no time.
Whether you're a small business owner or a developer looking to create e-commerce solutions for clients, Magento on Ubuntu offers a powerful platform to build and scale your online store. Take advantage of the flexibility and customization options Magento provides, and watch your business thrive in the world of e-commerce.
0 notes
Text
How do you edit WordPress on a localhost?
Editing a WordPress site on localhost involves setting up a local development environment on your computer. Here's a general guide on how to do this:
1. Install a Local Server Environment:
You can use software like XAMPP, MAMP, or Local by Flywheel. These tools provide a local server environment with Apache, MySQL, and PHP.
Download and install the software of your choice.
2. Download WordPress:
Visit the official WordPress website (https://wordpress.org/) and download the latest version of WordPress.
3. Set Up Database:
Open your local server software and start the server.
Create a new database for your WordPress installation. Note down the database name, username, and password.
4. Install WordPress:
Extract the WordPress zip file you downloaded.
Move the WordPress files to the root directory of your local server (e.g., htdocs in XAMPP).
Rename the wp-config-sample.php file to wp-config.php.
Open wp-config.php and enter your database details (database name, username, password).
5. Access Local WordPress Site:
Open your web browser and go to http://localhost/yourwordpressfolder (replace "yourwordpressfolder" with the actual folder name where you installed WordPress).
6. Edit Your WordPress Site:
Log in to your local WordPress site using the credentials you set during the installation.
You can now edit your WordPress site just like you would on a live server. Install themes, plugins, and make changes to content and settings.
7. Theme and Plugin Development:
If you are a developer and want to make theme or plugin changes, you can create a themes or plugins folder inside the wp-content directory and develop your code there.
8. Save Changes:
Any changes you make on your localhost won't affect your live site until you migrate the changes. For this, you might use a migration plugin or manually transfer files and the database.
Important Note: Always remember that changes made on your localhost won't reflect on the live site until you manually migrate the changes. Be cautious when making significant changes, and consider using a backup solution.
If you plan to move your site from localhost to a live server, you'll need to export your database and migrate your files. There are plugins and manual methods available for this purpose.
1 note
·
View note
Text
Easy TYPO3 installation: Manual & Composer methods!
TYPO3 is the most secure, fast and robust CMS that is powered by easy installation which makes it easy for anyone to create a website. Leading TYPO3 web hosting providers facilitate quick and straightforward TYPO3 installations, typically requiring less than five minutes to set up.
In this Step by step Tutorial We are looking into how to install TYPO3 Manually and Via Composer .
Let's Look How?
System Requirement for installing TYPO3
It's essential to ensure the proper prerequisites for CMS installation are in place.
This process primarily necessitates two key components: a web server and a database server.
Operating System : Linux, Windows or Mac, or cloud infrastructure
Web Server : Apache httpd, Nginx, Microsoft IIS, Caddy Server ,
Supported Browser : Chrome (latest) , Edge (latest) , Firefox (latest) , Safari (latest)
Composer Requirement : Composer >= 2.1
Database : MariaDB >= 10.2.7 <= 10.5.99 Microsoft SQL Server MySQL >= 5.7.9 <= 8.0.99 PostgreSQL SQLite
Hardware Requirement RAM >= 256 MB
PHP Version Support PHP >= 7.4.1 <= 8.1.99
How to Install Via Composer
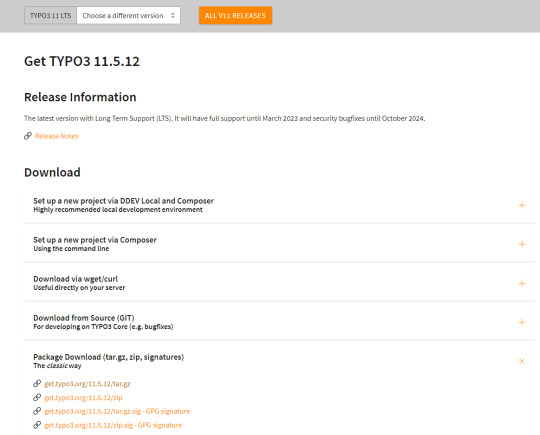
Step 1 Download TYPO3 From Website
The first step involves obtaining TYPO3 from its official website. You can acquire your preferred TYPO3 version from there.
2. Configure the Installation Files
Following Steps can be followed to setup the installation file of TYPO3.Begin by extracting the TYPO3 Zip file that you downloaded from TYPO3's official website. This will create a folder on your system containing all the necessary files for TYPO3.
Next, transfer these items to the server's designated folder Further , it is critical to decide the installation location for TYPO3. If you intend to Access it through main domains , this means you will need to Upload TYPO3 Files directly to public_html/ directory of your account..
However, if you have a different setup in mind, the location may vary accordingly.
there two different ways to transfer your records first is Utilising an FTP or second way of directly through cpanel account.
3.Initiate the Installation Process
To begin the installation process, generate a file named 'FIRST_INSTALL' within the same directory where you've uploaded your TYPO3 files.
This serves as a security checkpoint that grants permission to proceed with the installation. You can create this file using FTP or utilise the File Manager in your cPanel account.
4.Verification of System Requirements
To access the TYPO3 installation wizard, visit
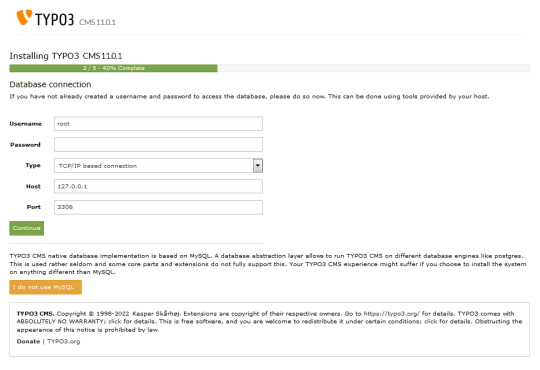
“ https://www.MY_INSTALL.com/typo3/install.php." This tool is designed to facilitate the TYPO3 installation process, which consists of five phases.
In the initial phase, the tool conducts a thorough examination of your system environment. If any issues arise as a result of system settings, you can utilize the troubleshooting function to address them. If no problems are detected, you can continue with the installation process.
5.Configuring TYPO3 Setup
For Configuring TYPO3 Setup You can follow this steps :
You'll integrate the MySQL database. Log in using the username 'root,' and note that no password is necessary when using the XAMPP installer.
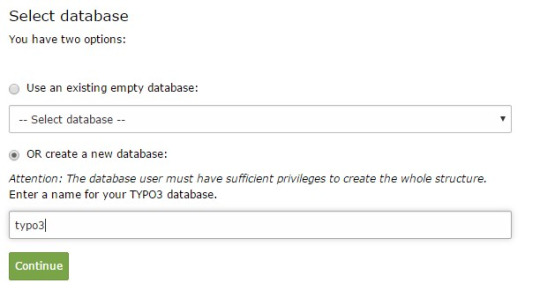
Next, you can either select an existing database or create a new one It's worth noting that you now have the option to use a different database implementation other than MySQL.
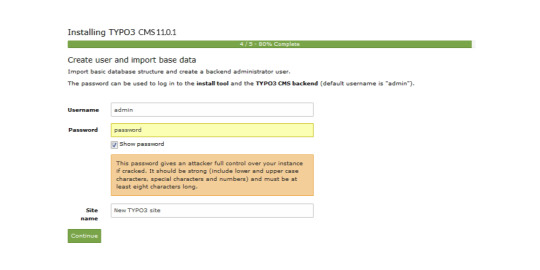
Next, you'll create an admin user for the TYPO3 backend. The password you set for this user will also be utilised for the install tool.
Now the installation itself is completed.
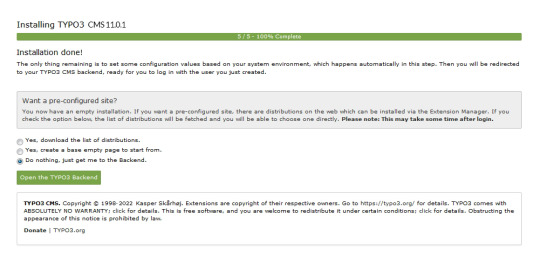
Lastly , the installation wizard finalises by automatically adjusting certain configurations to match your system environment.
However , You still have the option to choose whether TYPO3 will create an empty website or remain inactive temporarily.
By selecting 'Open the TYPO3 Backend,' you'll access the admin area, where you can log in using the account you just created.
Congratulations ! You have Completed and installed TYPO3 manually .
Install TYPO3 Via Composer Mode
For detailed instructions on installing TYPO3 using Composer, you can find a comprehensive step-by-step guide here: How to install TYPO3 - Manually & Via Composer
0 notes
Text
Online Course Registration Free Download

Online Course Registration System is Web-based registration software that helps you to register courses online. It is ideal for schools, educational camps, corporate training programs, and online training programs. It also provides time to time current status information related to courses. It can help for the student need to register by giving necessary details, for the desired course.
Click: https://phpgurukul.com/online-course-registration-free-download/
Project Modules
This Project Divided into two modules
Admin
Student
Admin:
Admin will register the student and provide username; password and pincode.Pincode will be used when a student enrolls for the course. Admin can manage session, semester, departments, course, students, students log Admin Panel. Admin can also add/ delete latest news and updates related to students.
Student:
Student can log in with valid reg no and password provided by admin. Student can enroll for any course and can printout of the registered course.
Online Course Registration System Installation Steps
1. Download and Unzip the file on your local system. 2. Copy onlinecourse and Put this file inside the root directory 3. Database Configuration
Database Configuration
Open PHPMyAdmin Create Database onlinecourse Import database onlinecourse.sql (available inside the zip package) Open Your browser put inside browser “http://localhost/onlinecourse”
****Login Details for admin****
Username: admin
Password: Test@123
****Login Details for Student****
Reg No.:10806121
Password: Test@123 Student Pincode for enroll Course Student: 822894
PHP Gurukul
Welcome to PHPGurukul. We are a web development team striving our best to provide you with an unusual experience with PHP. Some technologies never fade, and PHP is one of them. From the time it has been introduced, the demand for PHP Projects and PHP developers is growing since 1994. We are here to make your PHP journey more exciting and useful.
Email: [email protected] Website : https://phpgurukul.com
0 notes
Text
InfixEdu School Nulled Script 8.2.2
Unlock Academic Excellence with InfixEdu School Nulled Script Managing educational institutions has never been more streamlined and efficient. InfixEdu School Nulled Script offers a comprehensive, user-friendly platform tailored for schools, colleges, and universities aiming to digitize their academic and administrative operations. Whether you’re handling class schedules, exams, student records, or online communication, this powerful script delivers all the tools you need—without the hefty price tag. What is InfixEdu School Nulled Script? InfixEdu School is a fully-featured academic management system that empowers schools to operate in a digitally enhanced ecosystem. Designed for administrators, teachers, students, and parents, this script offers seamless coordination between different roles while reducing manual workload. With this nulled version, you can download, install, and experience all the premium features—absolutely free. Technical Specifications Framework: Laravel 8+ Database: MySQL 5.6+ Server Requirements: PHP 7.3+, Apache/Nginx Responsive Design: Fully mobile-optimized UI Languages Supported: Multilingual support including RTL languages Top Features and Benefits Student Information System (SIS): Easily manage student records, attendance, grades, and ID generation. Timetable & Exam Management: Automate scheduling for classes, exams, and events with intuitive calendar integration. Online Fee Collection: Integrated payment gateways for effortless fee tracking and management. Homework & Communication Tools: Teachers can assign homework and communicate directly with students and parents. Library & Inventory Management: Keep track of educational resources and supplies with real-time updates. Integrated HR & Payroll: Manage staff payroll, attendance, and leave requests all in one place. Why Choose InfixEdu School Nulled Script? Unlike costly academic systems, InfixEdu School offers premium-level features without financial commitment. It’s ideal for schools that want to go digital but need to keep costs minimal. Its elegant design, fast performance, and flexibility make it a standout option for institutions of any size. Use Cases Private Schools: Simplify day-to-day operations from enrollment to exams. Public Institutions: Manage large student databases and improve parent-teacher engagement. Tutorial Centers: Use it for class scheduling, result publishing, and student tracking. Online Learning Platforms: Enhance your digital course delivery with structured academic tools. How to Install InfixEdu School Nulled Script Download the InfixEdu School Nulled Script ZIP package from our website. Upload the files to your server using FTP or cPanel. Configure the .env file with your database credentials. Run the installation wizard and follow the on-screen steps. Login to the admin dashboard and begin customizing your settings. Our platform also offers other top-notch nulled plugins that can enhance your WordPress ecosystem. Frequently Asked Questions (FAQs) Is it legal to use InfixEdu School Nulled Script? While nulled scripts should be used responsibly, our version is intended for educational and testing purposes. We encourage you to evaluate the script thoroughly before considering a licensed copy. Does the script include all premium features? Yes, you get full access to every module and premium functionality present in the official version—without paying a dime. Can I integrate other plugins with this script? Absolutely. In fact, we recommend using popular tools like Slider Revolution NULLED to boost your site’s visual appeal and performance. Is support available for the nulled version? Official support may not be available, but our community and tutorials can help you resolve common issues. Conclusion InfixEdu School Nulled Script is your gateway to building a smarter, more efficient academic environment. With its robust suite of tools and zero-cost access, there’s no better time to digitize your educational institution.
Download it now and experience the future of school management—today.
0 notes
Text
Zip files in php
<?php $filePath = '/path/to/store/zip/in/'; $zip = new ZipArchive(); $download = "{$filePath}download.zip"; $zip->open($download, ZipArchive::CREATE); foreach (glob($filePath . "*.jpg") as $file) { #add it to the zip $zip->addFile($file); } $zip->close(); header("Pragma: public"); header("Expires: 0"); header("Cache-Control: must-revalidate, post-check=0, pre-check=0"); header("Cache-Control:…
View On WordPress
0 notes
Note
Hi Pooklet :) More than 10 years ago you posted your freckly skins at GOS (/gardenofshadows/ index. php?topic=12555.0) but the box link is dead aswell as the other link someone posted in the comments. Would it be possible for you to reupload this set ?

(link to post in question.)
hello anon! so, these should be available in here in my old content folder on simfileshare, but i am currently getting an error where when i try to download them myself, it's just a jumble of numbers and letters with no file extension. i don't know if that's a simsfileshare thing or a me thing. i'll try to reupload them and see what happens.
but in the interim, using the dead box link trick, i was able to get some working links for you.
geneticized version, custom version.
sorry for all the trouble!
edit: seems like simfileshare was mad about the comma in the zip name! i removed it and now the files work just fine on sfs.
#anonymous#pooklet replies#wcif#gif tag#oh no i've been forgetting to do cat gifs!#gotta go back and add them to asks!
14 notes
·
View notes
Photo


Khanysims / Souris Medieval Content
This site closed down recently and can still be viewed in Waybackmachine here: https://web.archive.org/web/20191222103524/http://www.khanysims.be/medieval-sims3.php
Unfortunately almost none of the download-links there are working. So this is another backup from my cc-archives.
The files are in .package format
I adjusted pricing to make bigger and fancier items sort later in the catalogue. For double-conversions by myself and Jennisims I used the same prices, so that these will show up in buymode close to each other.
Also deleted superfluous pattern images inside the packages (tsrw sometimes includes them)
Grouping into sets is slightly different than on the original site in order to streamline the folder-structure. All items are included though. The original read-me’s are also included, they have useful notes on some of the objects.
The Construction set has several more arches that are not shown here. The wooden fence on the other hand, is moved to Decoration.
The Tableaux/Paintings set and the Floor-Tiles are original .zips as they came from the site when it was still up - added thanks to @windermeresimblr ! However, I added cleaned .package versions of the paintings (see above). The patterns are safe to convert to .package format.
See also: Other sets by the same creator, backup of @archivethesims , found here. Thanks for the link!
Download: http://simfileshare.net/folder/105039/ or Dropbox
168 notes
·
View notes
Text
√B3DWa8I> D0WNL0AD Ishmael:A Novel by Daniel Quinn [PDF EBOOK EPUB KINDLE]
'KLOU.xb> COME AND DOWNLOAD Ishmael:A Novel by Daniel Quinn [PDF EBOOK EPUB KINDLE]

Download Read Online Free Now Ishmael:A Novel Download Full Book Here media24.php?asin=0553375407 Size: 16,308 KB D0wnl0ad URL => media38.php?asin=0553375407 - D0WNL0AD PDF Ebook Textbook Ishmael:A Novel by Daniel Quinn Last access: 83477 user Last server checked: 19 Minutes ago!
Ishmael:A Novel by Daniel Quinn [File PDF E-Book Download For Free]
Ishmael:A Novel by Daniel Quinn E-Book Download Here
Ishmael:A Novel by Daniel Quinn READ FOR FREE ONLINE ACCESS
Daniel Quinn by Ishmael:A Novel E-PUBLISH
Ishmael:A Novel by Daniel Quinn vk
Ishmael:A Novel by Daniel Quinn FILE FPF CAN BE DOWNLOAD FOR FREE HERE
Ishmael:A Novel by Daniel Quinn DOWNLOAD EBOOK
Ishmael:A Novel PDF FILE
Ishmael:A Novel by Daniel Quinn Amazon Online
Ishmael:A Novel by Daniel Quinn DOWNLOAD FILE PDF FOR FREE HERE
Ishmael:A Novel by Daniel Quinn FILE PDF FOR FREE
Ishmael:A Novel by Daniel Quinn PDF FILE
Ishmael:A Novel by Daniel Quinn HERE EPUB FOR DOWNLOAD
Ishmael:A Novel by Daniel Quinn FOR ONLINE
Daniel Quinn by Ishmael:A Novel DOWNLOAD E-PUB FOR FREE
Ishmael:A Novel by Daniel Quinn DOWNLOAD EPUB FOR VK
Ishmael:A Novel by Daniel Quinn HERE MOBI
d0wnl0ad Ishmael:A Novel PDF - KINDLE - EPUB - MOBI
Ishmael:A Novel d0wnl0ad ebook PDF EPUB, book in english language
[d0wnl0ad] book Ishmael:A Novel in format PDF
[PDF] [EPUB] Ishmael:A Novel by Daniel Quinn d0wnl0ad
synopsis of Ishmael:A Novel by Daniel Quinn
review online Ishmael:A Novel by Daniel Quinn
Ishmael:A Novel Daniel Quinn pdf download
Ishmael:A Novel Daniel Quinn read online
Daniel Quinn Ishmael:A Novel epub
Ishmael:A Novel Daniel Quinn vk
Ishmael:A Novel Daniel Quinn amazon
Ishmael:A Novel Daniel Quinn free download pdf
Ishmael:A Novel Daniel Quinn pdf free
Ishmael:A Novel pdf Daniel Quinn
Ishmael:A Novel Daniel Quinn epub download
Ishmael:A Novel Daniel Quinn online
Daniel Quinn Ishmael:A Novel epub download
Ishmael:A Novel Daniel Quinn epub vk
Ishmael:A Novel Daniel Quinn mobi
download Ishmael:A Novel PDF - KINDLE - EPUB - MOBI
Ishmael:A Novel download ebook PDF EPUB, book in english language
[download] book Ishmael:A Novel in format PDF
Ishmael:A Novel download free of book in format
Daniel Quinn Ishmael:A Novel epub vk
Ishmael:A Novel Daniel Quinn PDF FILE
Ishmael:A Novel Daniel Quinn ePub File
Ishmael:A Novel Daniel Quinn FILE DOC
Ishmael:A Novel Daniel Quinn RTF FILE
Ishmael:A Novel Daniel Quinn FILE WORD
Ishmael:A Novel Daniel Quinn FILE PPT
Ishmael:A Novel Daniel Quinn TXT FILE
Ishmael:A Novel Daniel Quinn E-BOOK FOR FREE
Ishmael:A Novel Daniel Quinn iBooks ACCESS
Ishmael:A Novel Daniel Quinn Kindle FILE
Ishmael:A Novel Daniel Quinn Rar file
Ishmael:A Novel Daniel Quinn Zip file
Ishmael:A Novel Daniel Quinn Mobipocket Access
Ishmael:A Novel Daniel Quinn Mobi Access Online
Ishmael:A Novel Daniel Quinn AUDIOBOOK ACCESS ONLINE
Ishmael:A Novel Daniel Quinn ONLINE REVIEWER
Ishmael:A Novel Daniel Quinn READ USING ONLINE ACCESS
Ishmael:A Novel Daniel Quinn DOWNLOAD HERE FREE ONLINE ACCESS Come And Download Ishmael:A Novel by Daniel Quinn D0wnl0ad LINK -> media89.php?asin=0553375407
1 note
·
View note
Text
Hospital Management System using Python Django and MySQL
Hospital Management System using Python Django and MySQL is web based application.The project Hospital Management system includes registration of patients, storing their details into the system. The software has the facility to give a unique id for every patient and stores the details of every patient.
Project Modules
Hospital Management System is web application for hospital which manages doctors and patients. In this project, we use Python with Django framework and MySQL database.
Click: https://phpgurukul.com/hospital-management-system-using-python-django-and-mysql/
The entire project mainly consists of 3 modules, which are
Admin module
User module (patient)
Doctor module
Admin module:
Dashboard: In this section, admin can view the Total Registered Doctors and Total Specializations.
Doctors List: In this section, admin can view doctor’s profile, their appointments and manage their patient list.
Reg Users: In this section, admin can view users detail (who take online appointment) and also have right to delete irrelevant user.
Patients: In this section, admin can view patient’s details.
Appointment History: In this section, admin can view appointment history.
Search Doctor: In this section, admin can search doctor details by their name and mobile number.
Doctor Reg Reports: In this section, admin can view reports of doctor in particular periods.
Webpage Page: In this section, admin can update the website page details.
Patient Search: In this section, admin can search patient with the help of patient name and mobile number.
Admin can also change his/her own password and profile.
User module (patient):
Dashboard: This is welcome page of user.
Book Appointment: In this section, Patient can book his/her appointment.
Appointment History: In this section, Patients can see his/her own appointment history.
User can update his/her profile, change the password and recover the password
Doctor module:
Dashboard: In this section, doctor can view total appointment, new appointment, approved appointment, cancelled appointment and total patient added by them.
Appointment: In this section, Doctor can see patient’s appointment status.
Patients: In this section, doctor can manage patients (Add/Update).
Search: Search has below sections:
Search Patient: In this section, doctor can search patient with the help of patient name and mobile number.
Search Appointment: In this section, doctor can search User(patient) with the help of name and mobile number.
Report: Report has below sections:
Appointment Report: In this section, doctor can generate between dates report of appointment which is take by registered users (patients).
Patient Report: In this section, doctor can generate between dates reports of patients which doctors add.
Doctor can also update his profile, change the password and recover the password.
How to run the Hospital Management system Django Python
1. Download the zip file
2. Extract the file, copy hms folder, and paste it on the desktop
3. Open MySQL Create a database hmspythondb then import the SQL File available in the SQL File Folder (For MySQL we used XAMPP server)
4. Open PyCharm and click on the terminal
5. Navigate the project folder using the cd command
cd project_path
For ex: cd C:\Users\ANUJ\OneDrive\Desktop\hms\
6. Now Navigate to the hospital folder
cd hospital
7. Run the Project using the following command
python manage.py runserver
PHP Gurukul
Welcome to PHPGurukul. We are a web development team striving our best to provide you with an unusual experience with PHP. Some technologies never fade, and PHP is one of them. From the time it has been introduced, the demand for PHP Projects and PHP developers is growing since 1994. We are here to make your PHP journey more exciting and useful.
Website : https://phpgurukul.com
0 notes